Set Up the Retail Solution (for solution admins)
This section will walk you through the steps to import and configure the solution to ensure a smooth setup and operation.
Prerequisites
- Tenant Druid community (open new tenant here) or Druid subscription.
- You should have an AI Agent. For information on how to create an AI Agent, see Creating AI Agents.
- API resources enabled for Druid WebView and Druid Data Service.
- Druid LLM API resources activated for Becus 1.0 and GPT-4.1. Contact your Druid sales representative to enable these resources and generate API tokens.
- Azure subscription credentials for the Blob Storage service to enable image upload in the claim process.
Installation and setup procedure
Step 1. Install the solution from the Solutions Library
Go to the Solutions Library, search for solution "Retail Agentic Solution" and import it following the instructions provided in section Installing Solution Templates.
Wait until the import status shows as “Success”.
Step 2. Configure app connections
Navigate to Solution Contents > Apps and configure the apps as follows:
| App | Description | Connection Details | Mandatory |
|---|---|---|---|
| Druid-SLM_Becus 1.0 | Used for anonymization of PII. |
Enter only the key the Variables tab. Take the key value from Administration > Druid Services. |
Yes |
| GPT 4.1 | Used for conversational orchestration. |
If provisioned via Druid Service Gateway, enter only the key the Variables tab. Take the key value from Administration > Druid Services. If you're using your own LLM resources, configure the details. |
Yes |
| Gemini | Used for image preview. | Enter your API key in the Variables tab. | Yes - for image preview only |
| AzureStorage | Used for file storage. |
Enter your Account Name and Account Key for claim images. If you use this app, tap the Use HTTPS toggle.
|
Yes - for file storage |
| SendGrid App Rest | Used for all the emails that are sent in the environment. | Enter your Azure subscription details: Account Name and Account Key. | Yes |

Click Publish to make the apps available.
Step 3. Set up the AI Agent special flows and optionally the Abandoned Cart
Go to the AI Agent details page and configure the following special flows:
| Special flow | Value | Mandatory |
|---|---|---|
| Welcome flow |
first-welcome-flow Info: When a chat starts, this flow initializes the retail demo database.
|
Yes |
| Intent not found flow | switch-intent | Yes |
| Inactivity End Conversation flow | create-draft-order | No. Only if you will activate the Abandoned Cart Automation, that automatically converts abandoned carts into draft orders for reporting. |
| Conversation Timeout (in minutes) |
Define inactivity duration (e.g., 20 minutes) that triggers the Inactivity End Conversation flow. At runtime, when the configured inactivity period is reached:
This ensures abandoned carts are properly tracked and reported, giving you actionable insights to recover potential lost sales. |
Yes only if you will activate the Abandoned Cart Automation. |
Save the AI Agent configuration.
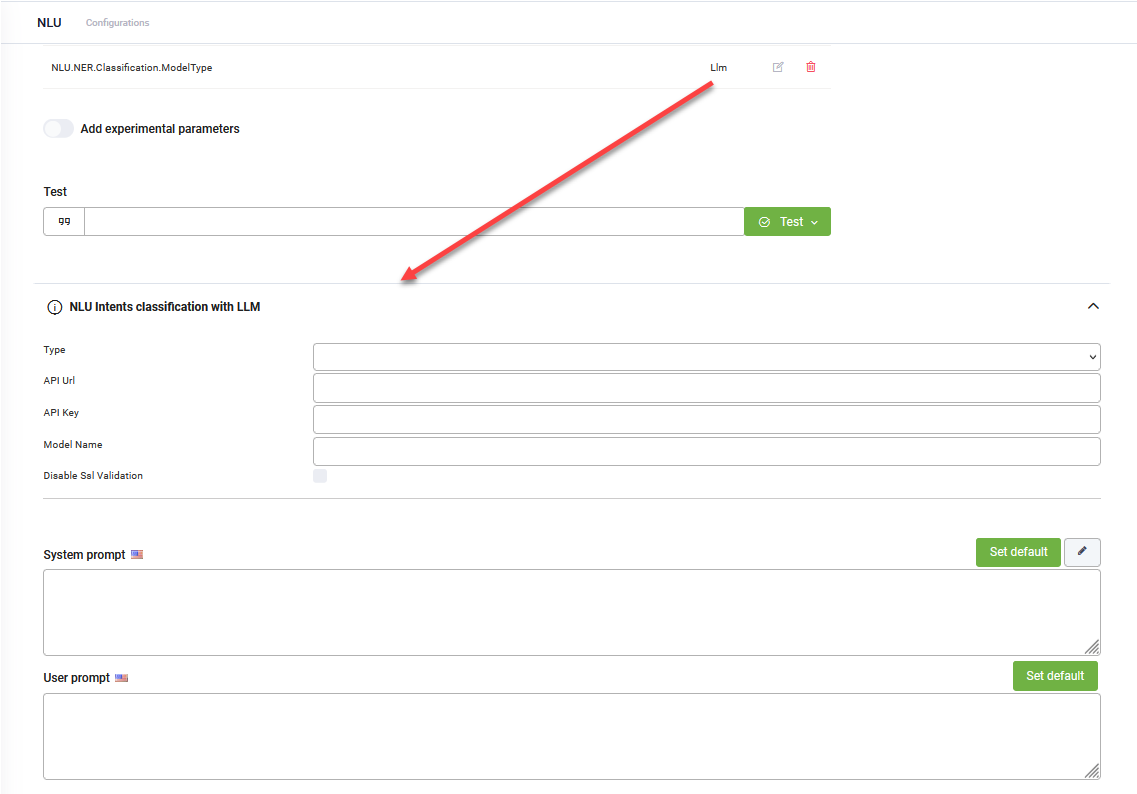
Step 4. Configure NLU Intents Classification with LLM
To configure NLU intents classification with LLM, follow these steps:
- Navigate to NLU > Configurations > Intents tab.
- Click on Thresholds and parameters.
- Add the NLU.NER.Classification.ModelType parameter and set it to LLM.
- From the Endpoint Type field, select Druid.
- From the Model Name field, select GPT 4.1.
- For both prompts, click the Set default button. The default Druid prompts will be automatically filled in.
- Click Save at the bottom of the page to apply the NLU configuration.
- Train the AI Agent.
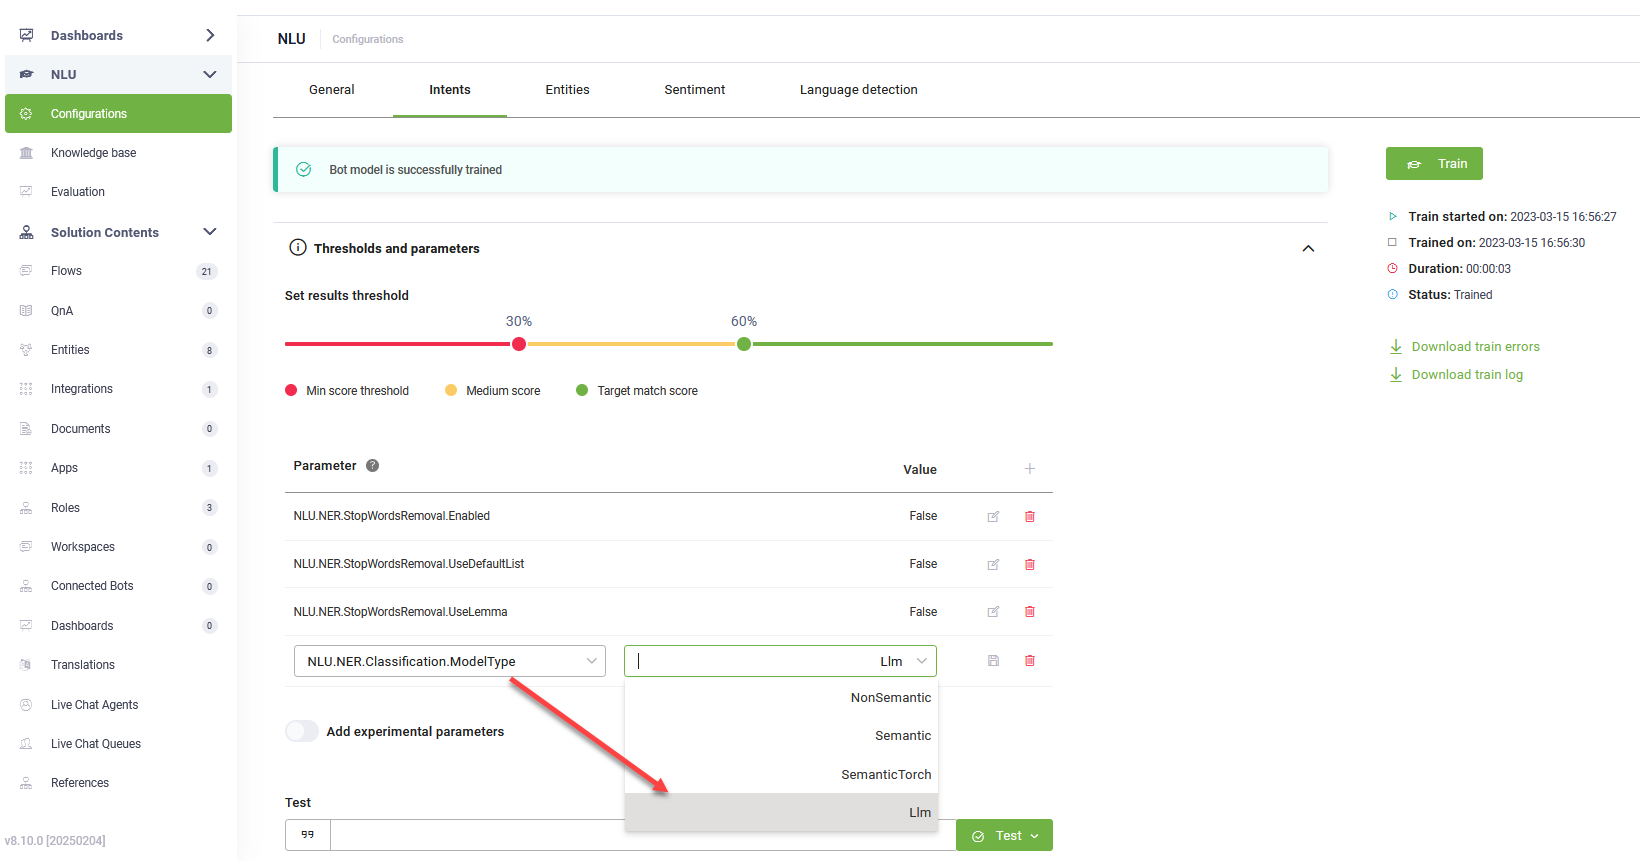
Click the link that appears in the message below the NLP parameters. The NLU Intents Classification with LLM expands.
Step 5. Provision the data
To provision all the required information for the AI Agent, follow these steps:
- Select the Admin workspace.
- Click RetailSettings on the workspace menu.
- Click the Provision Data button.
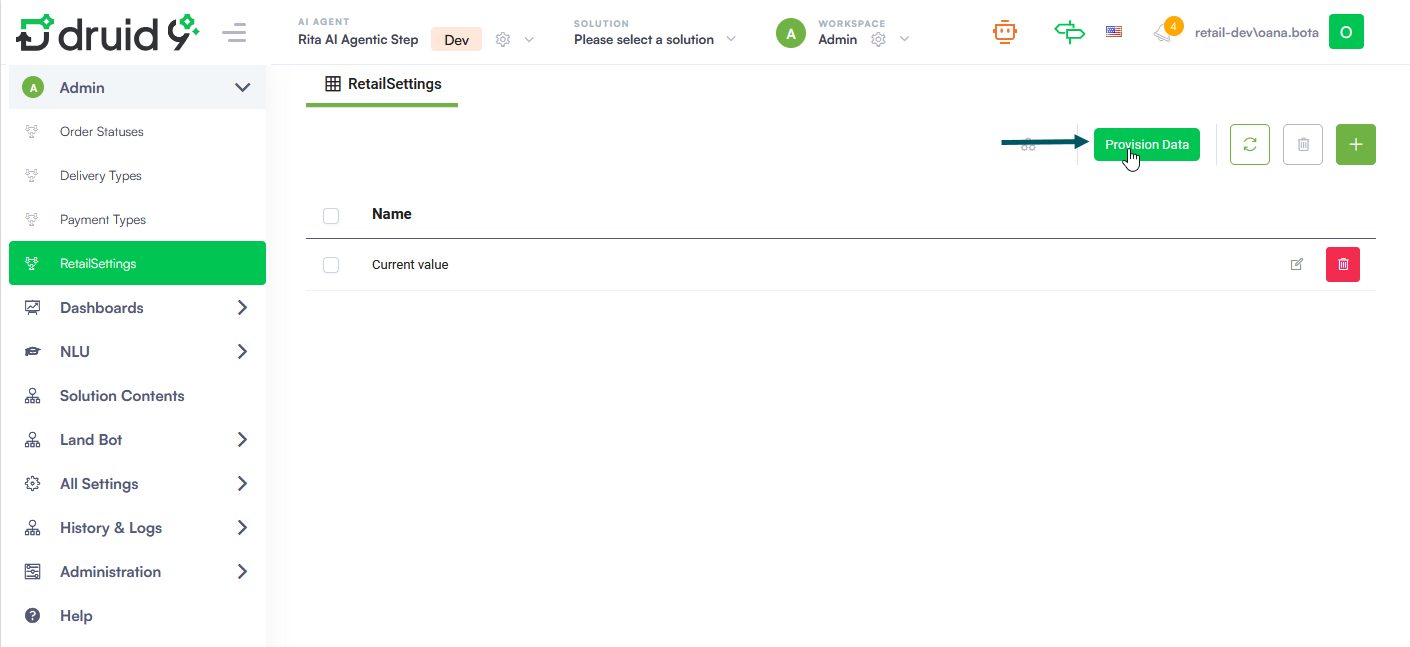
The default settings include a predefined set of values and records. You can extend the configuration at any time by manually adding new data records.
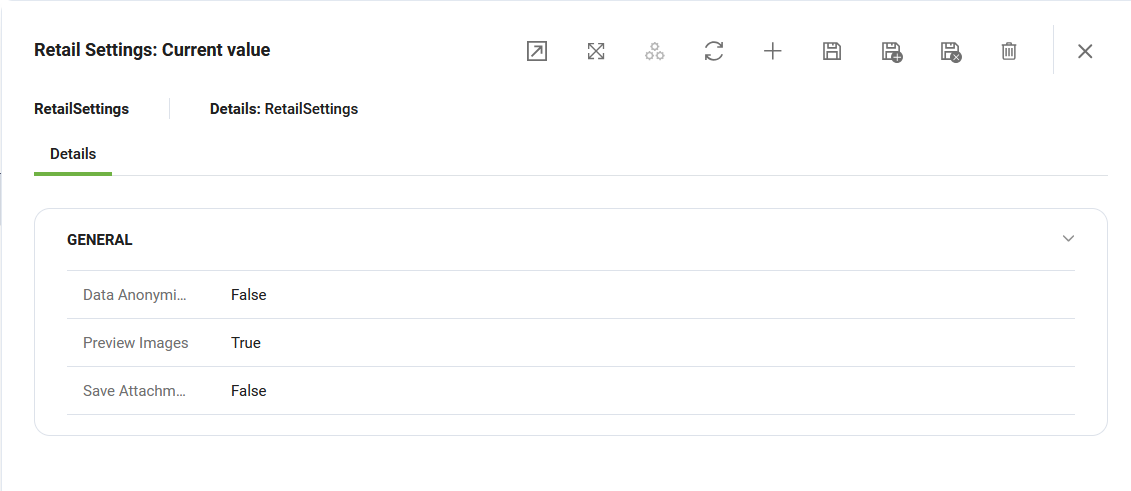
Step 6. Configure Advanced Settings: Anonymization, Image Preview, and Attachment Storage (optional)
Data Anonymization
The Data Anonymization feature adds a privacy layer between your users and any external AI services. When enabled, it automatically detects and redacts personally identifiable information (PII) — such as names, email addresses, and phone numbers — from user input before it is sent to a large language model (LLM). This is powered by Becus 1.0 and ensures that no identifiable data ever reaches an external AI context.
AI-Generated Visuals
The Image Preview feature allows users to visualize how a product would look in their own environment while browsing. For example, a user can see how a book would appear sitting on their desk. The preview is generated by Gemini, which composites a realistic image of the product into the user's defined context.
Azure Attachment Storage
The Save Attachments Azure setting determines where the solution stores images and files uploaded by users (for example, during a claim process).
How to activate
- Select the Admin workspace.
- Click RetailSettings on the workspace menu.
- Click the Current Value record to open it.
- On the settings form:
- Toggle Data Anonymization on to enable PII redaction before LLM transmission.
- Toggle Image Preview on to enable AI-generated product previews.
- Toggle Save Attachments Azure on if you wish to use Azure Blob Storage for user attachments. If set to false, this functionality is disabled.
- Click Save.
Additional Setup for Knowledge Base and Live Chat
The current solution version does not include preconfigured Knowledge Base (KB) or Live Chat functionality.
Within the switch-intent flow, two conversation paths are already defined, but are not implemented by default and remain currently inactive:
- Knowledge Base support
- Live Chat escalation
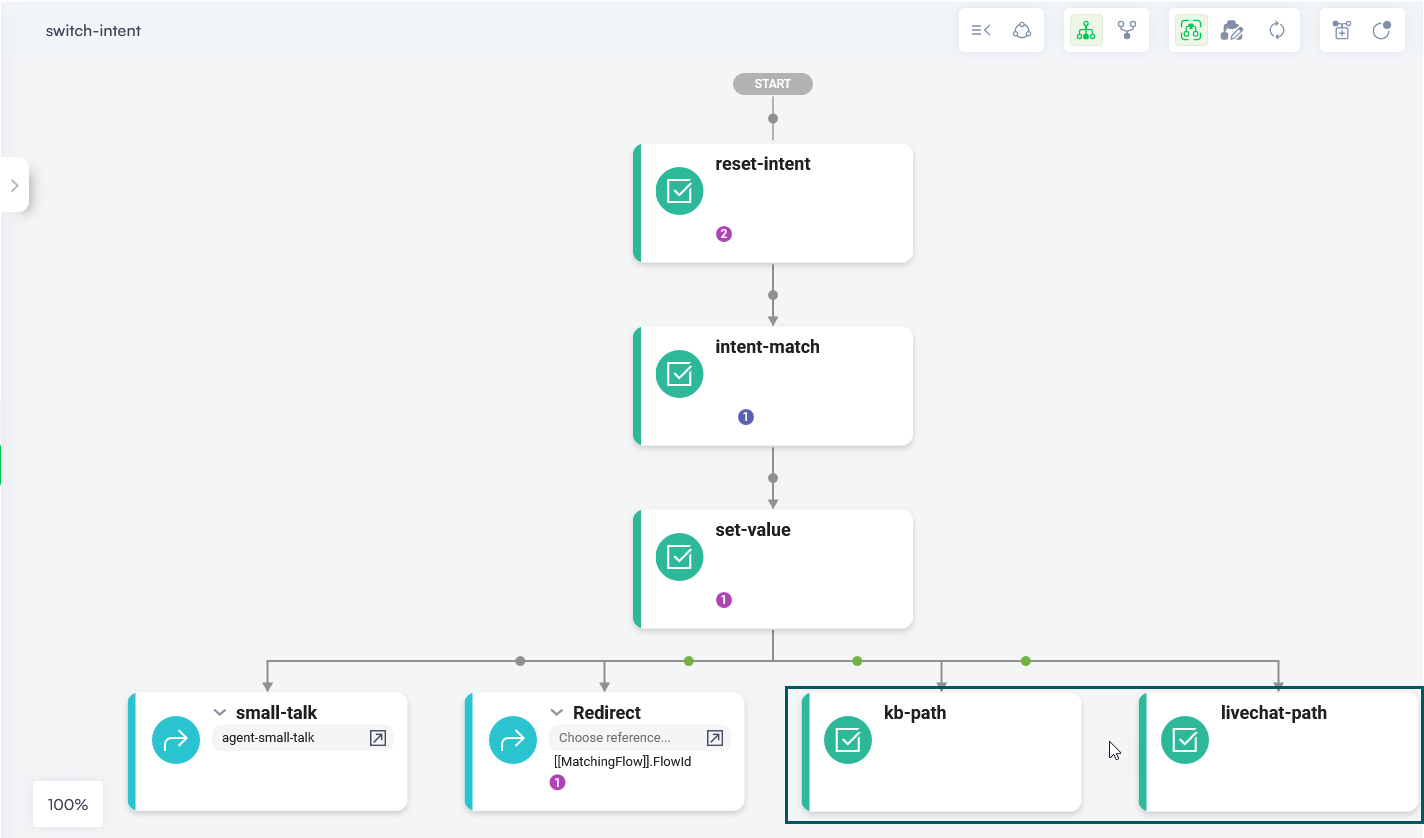
To enable these capabilities, you must configure them manually. Two approaches are available:
Recommended Approach
- Import Knowledge Base and/or Live Chat Advanced solutions from the Solutions Library and set them up.
- Use the flows provided by those solutions.
- Reference or connect those flows directly from the switch-intent flow (using the trigger flow functionality).
Alternative Approach
- Build and configure your own flows for KB search or Live Chat escalation.
- Use the custom flows in the existing placeholder paths in the switch-intent flow using the trigger flow functionality.
Until configured, these branches remain empty placeholders and are not triggered during conversations.
Running the Solution
Start a conversation with the assistant. Examples:
- “I’m in the mood for reading, what book do you recommend?”
- “I want to search for a product and I have an image” (upload an image).
- “I want to file a claim” (where the user has the option to add files).